

Upgrading Boat Electronics for Beginners

Table of Contents
- When to Upgrade Your Marine Electronics
- Essential Components for a Modern Marine Electronics Suite
- Marine Electronics Installation Tools You'll Need
- NMEA 2000 Network Setup for Beginners
- DIY Marine Wiring Best Practices
- Transducer Selection and Installation
- Common Mistakes to Avoid During Installation
- Budgeting for Your Marine Electronics Refit
Last Updated: August 22, 2026
When to Upgrade Your Marine Electronics
Your old chartplotter still powers on and finds satellites. But modern marine electronics suites integrate data in ways older standalone units cannot. Your 15-year-old Garmin handles basic navigation. A current system handles navigation, weather routing, engine diagnostics, and live sonar simultaneously on a single network, a different category of vessel awareness entirely.
Most boat owners wait too long to upgrade, missing the window when upgrading becomes straightforward. Consider upgrading when your multifunction display lacks NMEA 2000 networking, your transducer is older than eight years, your chartplotter cannot display weather overlays, your autopilot requires manual input for basic corrections, or your VHF radio lacks AIS integration. Planning a major voyage or competitive season is also a signal.
The cost argument breaks down when you examine what you're actually paying for: a system where every component talks to every other component, where a single sensor update refreshes data across your entire suite, and where redundancy keeps you safe if one component fails.
Essential Components for a Modern Marine Electronics Suite
A modern suite consists of five core components working together through NMEA 2000 networking.
![Digital Yacht NMEA 2000 Starter Cable Kit [ZDIGN2KIT]](https://cdn.shopify.com/s/files/1/0842/4914/9751/files/67952XL.jpg?v=1775844545)
Chartplotter and GPS Navigation Systems
Your chartplotter is the command center, displaying position, planned route, and environmental data on a single screen. Modern units offer screen resolutions rivaling automotive displays, instant touchscreen response, and the ability to layer multiple data types simultaneously.
GPS accuracy has improved dramatically. Older units offered 10-meter accuracy; current systems deliver 1-2 meter accuracy with WAAS correction (faa.gov). For recreational boating, this means you can navigate narrow channels and anchor in tight spots with confidence.
Look for a chartplotter with built-in weather routing capability, which pulls live weather data and suggests optimal routes based on current conditions and your vessel's performance characteristics. This is particularly valuable for coastal cruising or racing.
Radar and Sonar Technology Advancements
Modern marine radar operates at higher frequencies with lower power consumption than older units, delivering better target separation with less battery drain. Solid-state radar designs eliminate the spinning antenna, reducing maintenance and improving reliability.
Sonar technology has advanced more dramatically than any other marine electronics category. Side imaging sonar shows photographic-quality views of the bottom and structures beneath your boat. Live sonar updates that view in real time as you move, making it nearly impossible to miss underwater hazards. For fishing, this is transformative; for general boating, it provides an extra layer of situational awareness.
Prioritize sonar if you navigate shallow waters, fish, or anchor frequently. Radar becomes critical if you operate in fog, at night, or in heavy traffic.
Marine Electronics Installation Tools You'll Need
You don't need a professional workshop to upgrade boat electronics, but you do need the right tools.
Start with basic wiring tools: a marine-grade wire stripper (16 to 10 AWG), a crimper rated for marine terminals, and a heat gun for sealing connections. Marine-grade wiring is tinned copper with better corrosion resistance than standard automotive wire.
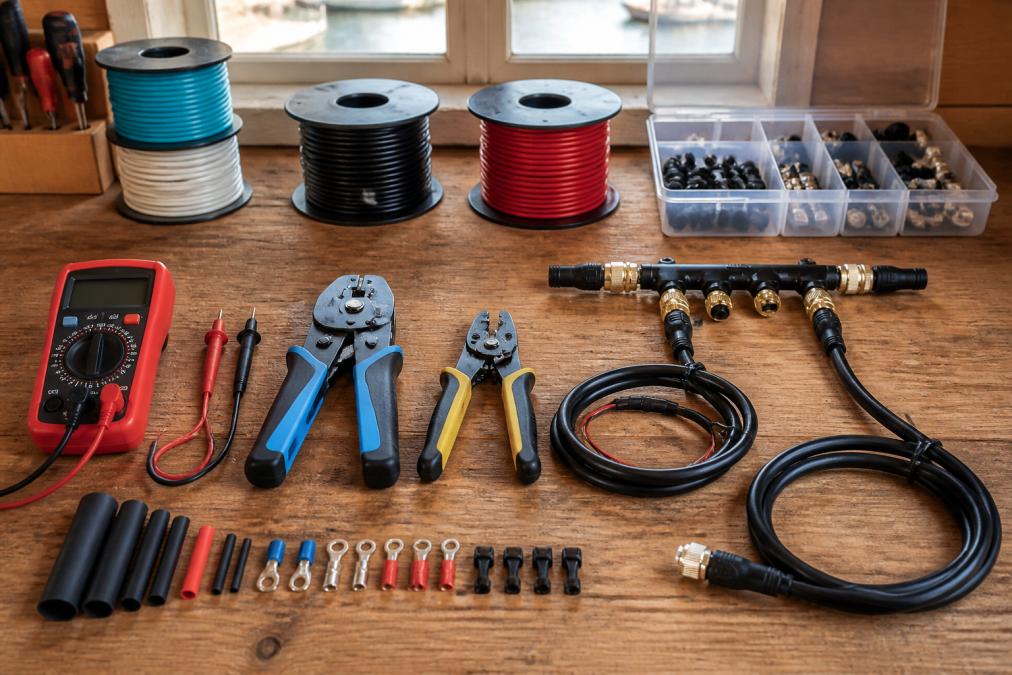
Add a digital multimeter rated for marine use to check voltage drops, verify power delivery, and troubleshoot wiring issues. Cable management tools matter more than most DIYers expect: UV-rated cable ties, adhesive-backed cable clips, and a fish tape for pulling cables through tight spaces prevent future chafing and pinching.
For NMEA 2000 networking, you'll need a terminator plug for the end of your network backbone. This small component prevents signal reflection that degrades data transmission and costs under $20.
Invest in a soldering iron only if comfortable with electrical work. For most installations, crimp connections are safer and more reliable than soldered joints on a moving boat.
NMEA 2000 Network Setup for Beginners
NMEA 2000 is the language your electronics speak to each other. It allows bidirectional communication, meaning your autopilot can receive heading data from your compass while simultaneously sending course corrections to your engine management system.
![Digital Yacht NavLink 2 NMEA 2000 to WiFi Gateway [ZDIGNLINK]](https://cdn.shopify.com/s/files/1/0842/4914/9751/files/76401XL.jpg?v=1775845541)
The network consists of a backbone cable (the main trunk), drop cables connecting individual devices, and terminator plugs at each end. The backbone is thicker than drop cables because it carries all network traffic.
Setting up NMEA 2000 properly prevents integration headaches. Most problems stem from incorrect termination, undersized cables, or daisy-chaining devices instead of using a proper backbone structure.
Understanding System Integration and Networking
System integration is where upgrading boat electronics delivers its biggest payoff. Instead of checking your autopilot, chartplotter, and radar separately, a properly integrated system shows all data on your primary display. Your autopilot knows your planned route and can suggest course corrections. Your engine management system displays fuel consumption and alerts you to problems before they become serious.
Integration requires that every device speaks the same language through NMEA 2000 standards. Devices from different manufacturers, a Garmin chartplotter, a B&G autopilot, and a Furuno radar, can coexist on the same network without compatibility issues. Charleston Yachting carries equipment from Garmin, B&G, and Harken, all of which integrate seamlessly through standard NMEA 2000 protocols.
Plan your network architecture before buying components. Sketch out where each device will mount, measure cable runs, and verify that your power supply can support the total electrical load.
DIY Marine Wiring Best Practices
Marine wiring differs from automotive wiring in ways that matter for safety and reliability. Saltwater environments corrode standard copper wire quickly. Marine-grade tinned copper resists corrosion but requires proper installation technique.
Start with properly sized wire. Undersized wire creates voltage drop, causing erratic behavior or failure. Use the American Wire Gauge (AWG) standard and follow manufacturer specifications. A 20-amp circuit running 30 feet typically requires 10 AWG wire; the same circuit running 10 feet requires 12 AWG.
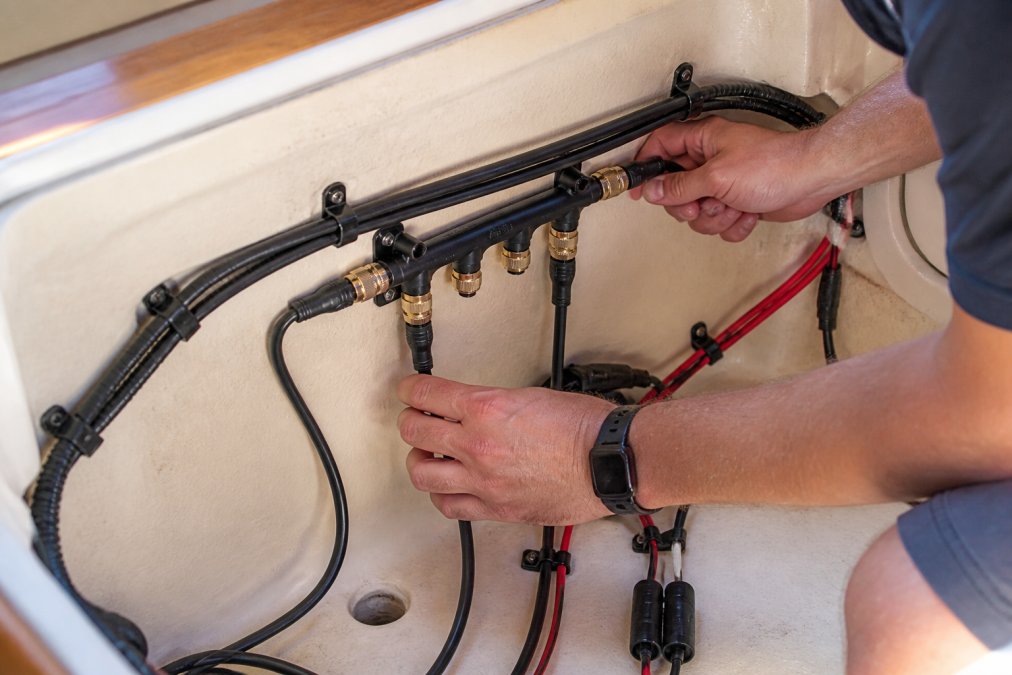
Every circuit needs a breaker or fuse rated for the wire gauge, not the device. This protects against short circuits that could damage equipment or start fires.
Use marine-grade terminals and connectors. Standard automotive terminals corrode in saltwater. When crimping terminals, use a crimper rated for marine terminals to create a reliable connection that won't loosen under vibration.
Strain relief is where most DIY installations fail. Where a cable enters a device or passes through a bulkhead, it needs protection from chafing and sharp edges. Use adhesive-backed cable clips rated for UV exposure, spaced every 18 inches. At bulkheads, use grommets or conduit.
Route power cables and signal cables separately. Keep them at least 12 inches apart; where they must cross, do so at right angles to minimize interference coupling.
Test every circuit before connecting devices. Verify voltage at the breaker, voltage at the device, and voltage drop across the entire run. Voltage drop should not exceed 3% of supply voltage, for a 12-volt system, no more than 0.36 volts lost across the entire circuit.
Transducer Selection and Installation
Your transducer is the sensor that collects sonar data. A transducer mounted incorrectly delivers poor performance regardless of sonar unit quality.
Transducers come in three types: through-hull (best performance, requires drilling), transom-mount (easier installation, adequate performance), and in-hull (convenient, requires compatible hull material). For upgrading boat electronics on a recreational vessel, transom-mount transducers are usually the practical choice.
Installation location matters significantly. Mount it on a flat section of transom, away from prop wash and outboard motor cavitation. If your boat has a trim tab, mount the transducer ahead of it, not behind it. Turbulence from the trim tab degrades sonar performance.
Before drilling any mounting holes, verify that the location doesn't intersect with fuel tanks, water tanks, or electrical systems. Use a stud finder or magnetic locator, then drill a small pilot hole and verify with a camera before enlarging it.
Use marine sealant rated for below-waterline applications. Standard caulk fails in saltwater. Apply sealant to the transducer base before mounting and allow it to cure fully before launching.
Common Mistakes to Avoid During Installation
The most common mistake is underestimating cable run distances. Measure twice, buy extra.
The second mistake is mixing NMEA 0183 and NMEA 2000 devices without proper gateways. If you have older NMEA 0183 equipment you want to keep, budget for a gateway device like the Actisense NMEA 0183 to NMEA2000 Gateway with WiFi and PC Interface ($361.35).
![Actisense NMEA 0183 to NMEA2000 Gateway w/WiFi PC Interface - ISO Connection [WGX-1-ISO]](https://cdn.shopify.com/s/files/1/0842/4914/9751/files/111791XL.jpg?v=1775850232)
The third mistake is failing to plan for firmware updates. Modern marine electronics receive regular software updates. Plan your network topology to support updates before installation.
Voltage drop across long power runs causes erratic behavior difficult to diagnose. Test voltage at the device before troubleshooting anything else.
Improper grounding creates noise that degrades sonar and radar performance. Every device needs a dedicated ground wire running directly to the negative bus, not daisy-chained through other devices.
Budgeting for Your Marine Electronics Refit
The cost of upgrading boat electronics varies depending on your starting point and goals. A basic upgrade, replacing an old chartplotter with a modern multifunction display and adding sonar, typically runs $2,000 to $4,000 for equipment plus installation.
A comprehensive refit including chartplotter, autopilot, radar, sonar, networking, and wiring upgrades can exceed $10,000. Professional installation adds another $2,000 to $5,000.
For DIY installations, budget for tools and materials you might not own. A quality multimeter, crimper, and marine-grade wiring supplies add $200 to $400. This prevents expensive mistakes.
Start with a priority list. Chartplotter and sonar deliver the most immediate benefit. Autopilot improvements come next. Radar and AIS integration are valuable for serious cruising or racing but less critical for casual boating.
Modern marine electronics typically last 10-15 years (peer-reviewed research). A $3,000 chartplotter over 12 years costs about $250 per year for the safety and convenience it provides.
Charleston Yachting stocks networking components that make DIY installation more accessible. The Digital Yacht NMEA 2000 Starter Cable Kit ($139.95) provides everything needed for basic network setup. The Digital Yacht NavLink 2 NMEA 2000 to WiFi Gateway ($309.95) lets you connect your NMEA 2000 network to apps on smartphones and tablets.
Frequently Asked Questions
What are the first boat electronics I should upgrade?
Start with your chartplotter and GPS navigation system if it's over 10 years old, modern units offer significantly better screen resolution, faster processing, and improved weather overlay capabilities. Next, consider upgrading your depth sounder and transducer, as these directly impact safety and fishing/navigation accuracy. If your boat has older NMEA 0183 wiring, upgrading to NMEA 2000 networking should be part of your plan, as it simplifies system integration and allows multiple devices to share data seamlessly.
How do I ensure my new marine electronics are compatible with my existing system?
Check your current system's networking standard, NMEA 0183 or NMEA 2000. Most modern electronics support NMEA 2000, but older systems may still run NMEA 0183. Use a gateway device like the Actisense NMEA 0183 to NMEA2000 Gateway (WGX-1-ISO) at $361.35 to bridge incompatible systems. Verify voltage requirements (typically 12V or 24V marine systems) and confirm that new transducers match your hull type. When in doubt, consult the manufacturer's compatibility matrix or contact a marine electronics specialist.
Is it hard to install marine electronics yourself?
Most DIY boat owners can handle basic installations with the right tools and patience. Chartplotter mounting, transducer installation, and basic wiring are straightforward if you follow manufacturer instructions carefully. The most challenging part is typically routing wiring through tight cabin spaces and ensuring proper voltage drop calculations to avoid power issues. NMEA 2000 networking is simpler than older NMEA 0183 systems because cables are standardized. Start with easier upgrades like GPS units before tackling complex multifunction display installations.
What tools do I need for a DIY marine electronics installation?
Essential marine electronics installation tools include a quality multimeter for voltage testing, wire strippers rated for marine-grade wiring, crimpers for proper terminal connections, a drill with marine-rated bits, and a heat gun for shrink-wrap sealing. You'll also need a voltage drop calculator and proper marine-grade wiring (typically 10 AWG or larger for main power runs). For NMEA 2000 network setup, you need the appropriate connectors and a Digital Yacht NMEA 2000 Starter Cable Kit ($139.95) to ensure proper system integration.
Upgrading boat electronics doesn't require professional credentials or a $20,000 budget. It requires planning, the right tools, and a willingness to follow specifications exactly. Start with a clear goal, better navigation, improved sonar, or system integration, and build around that foundation. Charleston Yachting carries premium equipment from Garmin, B&G, and Harken, with same-day shipping to get your refit underway immediately. Shop all marine electronics and begin your upgrade today.
This article was written using GrandRanker