

Sailing Hardware for Weekend Maintenance

Table of Contents
- Rigging Hardware Essentials for Weekend Inspection
- Deck Hardware and Fittings You Should Check
- Sailboat Rigging Maintenance Checklist
- DIY Sailboat Maintenance Tools You Need
- Best Marine Lubricants for Sailing Hardware
- Steering System and Rudder Bearing Maintenance
- Weekend Maintenance Workflow and Hardware Compatibility
- Conclusion
Last Updated: August 17, 2026
Rigging Hardware Essentials for Weekend Inspection
Turnbuckles, shackles, and swaged terminals form the backbone of your standing rigging. A single corroded or loose connection can turn a pleasant sail into a dangerous situation. The good news: checking these components takes less than an hour, and most issues are preventable with basic attention.
Turnbuckles adjust tension in your shrouds and stays by rotating the barrel to tighten or loosen the wire rope. Salt spray corrodes the threads, and vibration works them loose. Look for visible corrosion, verify the lock pins or seizing wire are in place, and check that the barrel hasn't rotated more than a quarter turn since your last inspection. If a turnbuckle spins freely without tightening the rigging, replace it.
Shackles connect wire rope to fittings and sails. Stainless steel resists corrosion better than galvanized alternatives. Inspect the pin for corrosion and ensure the cotter pin hasn't fallen out, a missing cotter pin is a common failure point. If the pin is bent or corroded, replace it immediately.
Swaged terminals are permanent connections at the end of wire rope, pressed onto the wire under extreme force at the factory. They're stronger than mechanical terminals but cannot be repaired. If a swaged terminal shows cracking or corrosion extending into the wire, the entire stay or shroud needs replacement.

Turnbuckles, Shackles, and Swaged Terminals
Rotate each turnbuckle slowly by hand to feel for grinding or rough spots, which signal internal corrosion. For stainless steel turnbuckles, apply a light coating of marine grease to the threads every few months to prevent salt buildup. Check your lock pins or seizing wire, if using cotter pins, bend them so they can't work loose.
Shackles are failure points when neglected. Inspect the pin for white corrosion (harmless aluminum oxide) and red corrosion (rust indicating weakness). If you see red corrosion, replace the shackle. The cotter pin must be present and bent outward, tightness alone doesn't prevent the pin from backing out under load.
Swaged terminals rarely fail if installed correctly, but inspect them anyway. Look for cracks radiating from where the terminal meets the wire, indicating metal fatigue. Check for corrosion that's eaten into the wire itself. If the wire diameter is visibly reduced where it enters the terminal, replacement is urgent. Order a replacement from Charleston Yachting, same-day shipping means you can have a new stay ready before your next sail.
Wire Rope and Cotter Pins
Wire rope deteriorates from the inside out. Run your hand along each stay and shroud, feeling for flat spots, kinks, or crushed areas. Any of these indicate damage requiring replacement.
Check the cotter pins holding shackles and toggles. Inspect each one to ensure it's present, bent outward, and not corroded. If a cotter pin is missing, install a new one immediately. Keep a small supply of stainless steel cotter pins in your tool kit.
Deck Hardware and Fittings You Should Check
Deck hardware takes the most abuse because it's exposed to sun, salt, and constant movement. Blocks, cleats, fairleads, and lifeline fittings are all under load when you're sailing. Start at the mast base and work outward. Check that all fasteners are tight using a wrench, and inspect the washers and backing plates underneath. Corrosion under a washer weakens the connection. If you find corrosion, remove the fastener, clean the area, and reinstall with a thin coat of marine grease.
Blocks and pulleys carry the load of your sails. Inspect the sheave (the wheel inside the block) for flat spots or damage and spin it by hand to ensure it rotates smoothly. If it binds or makes noise, the bearing is failing and the block needs replacement.
Blocks, Cleats, and Fairleads
For plain bearing blocks, the sheave rides on a metal pin. Corrosion causes the sheave to bind. If a block is hard to turn by hand, soak it in fresh water for a few minutes, then work it back and forth to loosen corrosion. If it still binds, replace the block. The Barton Plain Bearing Pulley Block Back to Back Swivel Block (Size 1, 30mm) handles rope up to 8mm and costs $17.16.
![Barton Plain Bearing Pulley Block Back to Back Swivel Block - Size 1, 30mm [N01280]](https://cdn.shopify.com/s/files/1/0842/4914/9751/files/113709XL.jpg?v=1775752341)
Cleats are where you attach your lines and take constant pulling force. Check that every cleat is bolted securely to the deck. If a cleat feels loose, remove it, clean the mounting area, and reinstall with new fasteners.
Fairleads guide rope from the winch to the cleat or block. Inspect the fairlead for cracks or sharp edges that could fray your rope. If cracked, replace it. Sharp edges should be smoothed with a file or sandpaper.
Lifeline Fittings and Hiking Strap Hardware
Lifelines keep crew members on the boat, so every connection must be secure. Inspect the toggles connecting the lifeline to the stanchion base. If a toggle doesn't move freely, soak it in fresh water and work it loose. If it remains stuck, replace it.
Check the tension in your lifelines. They should be tight enough that you can't move them more than an inch vertically when you push on them. Adjust the tension by tightening the turnbuckles at the lower end.
Hiking strap hardware includes the attachment points where the strap bolts to the deck or cabin. Inspect each bolt and ensure it's tight. Check the strap itself for tears or fraying. If damaged, replace it.
Sailboat Rigging Maintenance Checklist
A structured approach to weekend maintenance keeps you from missing critical items. Use this checklist as your starting point, customizing it based on your boat's age and condition.
Preventative Inspection Steps
Walk around your boat and visually scan every piece of rigging. Look for anything obviously wrong: a shackle hanging open, a turnbuckle that's rotated, a cracked block.
Do a hands-on inspection of each major component. Grip each stay and shroud and feel for damage. Rotate each turnbuckle to check for grinding or resistance. Spin each block to ensure the sheave moves freely.
Check all fasteners with a wrench. Vibration from sailing works fasteners loose over time, and loose fasteners are the first step toward failure. Keep a small wrench kit on board.
Inspect the mast from top to bottom. Look for cracks in the aluminum, bent sections, or corrosion. Cracks indicate the mast is compromised and needs professional inspection before you sail again.
Document your inspection in writing. Take photos of any damage or corrosion and note what you fixed. This record helps you spot trends over time.
When to Repair vs. Replace
Corrosion on stainless steel hardware is usually cosmetic and can be cleaned with a wire brush and fresh water. Red corrosion (rust) indicates the hardware has started to fail and should be replaced. Corrosion inside a turnbuckle that makes it grind means the threads are damaged and the turnbuckle should be replaced.
A loose fastener can be tightened. A corroded fastener should be replaced. A cracked or bent fastener must be replaced. Wire rope with minor corrosion can be cleaned and left in service. Wire rope with flat spots, kinks, or visible damage to individual strands should be replaced. Swaged terminals with cracks radiating from the terminal body indicate metal fatigue and the entire stay should be replaced.
DIY Sailboat Maintenance Tools You Need
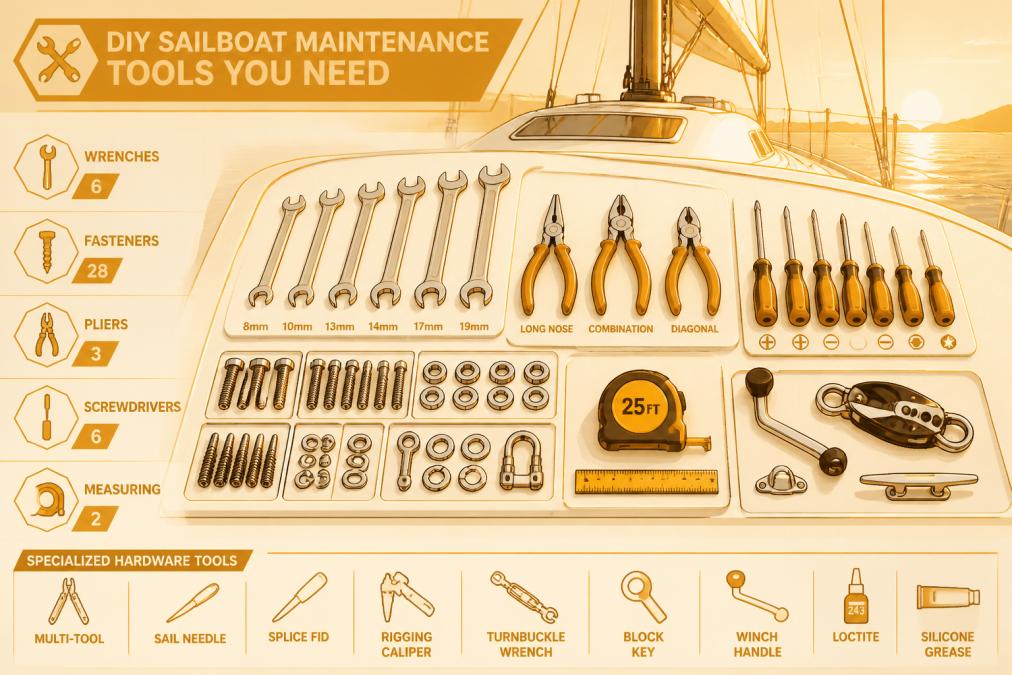
You don't need a full machine shop to maintain your rigging. A basic tool kit covers 95% of weekend maintenance tasks.
Wrenches, Fasteners, and Adjustment Tools
Start with an adjustable wrench or a small set of open-end wrenches. Most sailboat hardware uses metric fasteners (8mm, 10mm, 12mm). Include a small socket set for bolts that are recessed or hard to reach.
A set of screwdrivers (Phillips and flathead, various sizes) handles fasteners throughout the boat. Stainless steel screwdrivers resist corrosion better than plated alternatives.
Keep cotter pins and stainless steel fasteners on hand. Stock M6, M8, and M10 bolts with washers and lock washers.
A wire brush cleans corrosion from stainless steel hardware. A small file smooths sharp edges on fairleads and worn spots on blocks. Pliers are essential, slip-joint pliers or adjustable pliers handle most tasks, while needle-nose pliers reach into tight spaces.
Specialized Hardware Tools for Transducers and Steering
If your boat has through-hull transducers, an Airmar 75WR-2 Transducer Hull Nut Wrench ($46.00) makes installation and removal much easier. This single-handed wrench tightens the hull nut on bronze and stainless steel transducer housings without stripping the fitting.
![Airmar 75WR-2 Transducer Hull Nut Wrench [75WR-2]](https://cdn.shopify.com/s/files/1/0842/4914/9751/files/57082XL.jpg?v=1775843534)
For boats with steering cables, a cable lubricator tool helps you inject grease into the cable housing, extending cable life and keeping the steering smooth. Keep a small container of marine grease on board. Use it on turnbuckle threads, block sheaves, and steering cables.
Best Marine Lubricants for Sailing Hardware
The right lubricant keeps hardware moving smoothly and prevents corrosion. The wrong lubricant washes away in salt water and leaves your hardware vulnerable.
Corrosion Prevention and Stainless Steel Care
Marine grease is thicker than regular grease and resists salt water. It clings to hardware better and provides longer protection. Apply a thin coat to turnbuckle threads, block sheaves, and steering cables. Reapply every few months or after heavy rain or saltwater exposure.
Silicone spray lubricant is useful for light corrosion removal and penetrating stuck fittings. Spray a corroded bolt with silicone lubricant, wait a few minutes, and try again.
Stainless steel hardware resists corrosion better than galvanized or painted steel, but it's not immune. Clean stainless hardware with fresh water and a soft brush every few months. Never use abrasive cleaners or steel wool on stainless steel, as they can scratch the surface and create sites for corrosion. Use a soft brush or cloth instead.
Cotter pins and fasteners should be stainless steel whenever possible. Galvanized or painted fasteners corrode quickly in salt water and become difficult to remove.
Steering System and Rudder Bearing Maintenance
Your steering system is critical to boat control and often gets neglected until something breaks. Mechanical steering systems use cables or rods to connect the wheel to the rudder. Check the cable for fraying or corrosion. If frayed, it's weakening and should be replaced. Apply marine grease to the cable where it enters the steering box.
Rudder bearings support the rudder shaft and allow it to rotate smoothly. If the rudder feels stiff when you turn the wheel, the bearings may be corroded or the rudder may be hitting the hull. Fresh water flushing and lubrication often help. If the rudder feels loose or has play when you move it by hand, the bearings are worn and may need professional inspection.
![Davis Rudder Position Indicator [385]](https://cdn.shopify.com/s/files/1/0842/4914/9751/files/45960XL.jpg?v=1775842325)
Weekend Maintenance Workflow and Hardware Compatibility
The best maintenance plan is one you'll actually follow. A structured weekend workflow keeps you on track.
Sizing and Compatibility Guides
Before you buy replacement hardware, verify that it's compatible with your boat and existing rigging. Blocks come in different sizes based on the rope diameter they're designed for. The Barton Plain Bearing Pulley Block Back to Back Swivel Block (Size 1, 30mm) is designed for rope up to 8mm. If your boat uses larger rope, you need a larger block.
Turnbuckles come in different thread sizes and lengths. The thread size must match the wire rope diameter, and the length must be long enough to provide adequate adjustment range. Shackles also come in different sizes. The pin diameter must match the rope diameter or fitting hole it's connecting.
Stainless steel hardware is not all the same grade. 304 stainless steel is common and offers good corrosion resistance. 316 stainless steel is more corrosion-resistant and better for saltwater use. If you're replacing hardware, upgrade to 316 stainless if the original was 304.
Preventative vs. Reactive Maintenance Strategy
Preventative maintenance catches problems before they become failures. A 10-minute inspection every weekend prevents problems that could take hours to fix at sea. Document your maintenance in a log. Note what you inspected, what you found, and what you fixed. Over time, this log shows you patterns.
| Maintenance Task | Frequency | Time Required | Priority |
|---|---|---|---|
| Visual scan of rigging | Every weekend | 5 minutes | Critical |
| Hands-on inspection of stays and shrouds | Every weekend | 10 minutes | Critical |
| Tighten all deck fasteners | Monthly | 20 minutes | High |
| Clean stainless steel hardware | Monthly | 15 minutes | Medium |
| Inspect blocks and pulleys | Monthly | 10 minutes | High |
| Lubricate turnbuckle threads | Quarterly | 15 minutes | Medium |
| Replace corroded fasteners | As needed | Varies | High |
| Flush steering cable with fresh water | Quarterly | 20 minutes | High |
Keeping your boat ready for the weekend starts with understanding what hardware matters most and what problems to watch for. Turnbuckles, shackles, and blocks are the foundation of safe rigging. Inspect them regularly, replace them when they show wear, and don't assume something is fine just because it looks okay.
Charleston Yachting stocks the replacement hardware you need, including quality blocks, fasteners, and specialized tools like the Airmar transducer wrench. With same-day shipping, you can order a replacement Friday evening and have it on your boat Saturday morning. Shop All to browse the full selection of rigging hardware and maintenance tools.
Preventative maintenance costs less than emergency repairs and keeps you sailing safely all season.
Frequently Asked Questions
What are the most common sailing hardware parts that need regular maintenance?
Turnbuckles, shackles, blocks, cleats, lifeline fittings, and steering cables are the primary components requiring regular inspection. Stainless steel fasteners and swaged terminals also need checking for corrosion and mechanical wear. Most weekend sailors should inspect these items at least monthly, especially after heavy use or exposure to saltwater conditions.
How often should I inspect my standing rigging and deck hardware?
Inspect standing rigging and deck hardware every two to four weeks during sailing season, or before any extended voyage. Check for corrosion on stainless steel fittings, verify that cotter pins and toggles are secure, and ensure all sheaves and fairleads rotate freely. Early detection of wear prevents costly failures and safety issues on the water.
What basic tools are required for DIY sailboat hardware maintenance?
Essential DIY sailboat maintenance tools include adjustable wrenches, socket sets, a transducer hull nut wrench for electronics, hex keys, and a multi-tool. You'll also need seizing wire, cotter pins, and fasteners in common sizes. The Airmar 75WR-2 Transducer Hull Nut Wrench ($46.00) is specifically designed for single-handed tightening of bronze and stainless steel housings on marine transducers.
What are the best practices for cleaning and protecting stainless steel sailing hardware?
Clean stainless steel fittings with fresh water and mild soap immediately after saltwater exposure. Use a marine-grade lubricant or corrosion inhibitor spray to protect exposed fasteners and moving parts. Apply seizing wire around cotter pins and toggles to prevent loosening, and inspect for pitting or discoloration. Regular lubrication extends hardware life and reduces replacement frequency.
Can I perform my own sailboat rigging maintenance, or do I need professional help?
Weekend sailors can handle basic maintenance tasks like cleaning, lubrication, fastener tightening, and visual inspections using a sailboat rigging maintenance checklist. However, major rigging adjustments, mast tuning, or replacement of swaged terminals typically require professional expertise. Start with preventative inspections and simple repairs, then consult a marine technician for complex work.
This article was written using GrandRanker