

Harken Rigging Hardware Replacement Guide

Table of Contents
- When to Replace Harken Rigging Hardware
- Tools and Materials You'll Need
- Step-by-Step Compatibility Verification
- Best Marine Hardware for Saltwater Environments
- Installation Procedures for Deck Hardware
- Sailboat Rigging Inspection Checklist
- Troubleshooting Common Installation Errors
Last Updated: August 24, 2026
When to Replace Harken Rigging Hardware
Harken rigging hardware replacement becomes necessary when your standing rigging shows visible corrosion, fails load testing, or exhibits reduced performance during sailing. The most common indicators are surface pitting on stainless steel components, difficulty engaging cam cleats, or excessive play in swaged connections. Many boat owners delay replacement because their hardware still functions, but waiting until complete failure risks mast collapse or rigging failure during critical moments on the water.
Wire forestay corrosion is particularly dangerous. Salt spray and UV exposure degrade the protective coating over time, and once corrosion penetrates the wire core, structural integrity drops rapidly. A visual inspection every season catches problems early. Look for discoloration, white oxidation, or any visible cracks in the swaging where wire meets the fitting.
Harken rigging hardware replacement should also be considered during major refits or when upgrading to newer technology. Older hardware often uses different load ratings than modern equivalents, which matters if you're increasing sail area or changing your boat's rigging configuration. Compatibility becomes critical, mismatched hardware creates weak points in your rig.
The deck hardware layout directly affects replacement timing too. If your boom vang, mainsheet system, or genoa lead car shows excessive wear, replacing the entire system at once prevents future failures. This is where Charleston Yachting's inventory of Harken components helps, you can source matched sets that work together seamlessly.
Tools and Materials You'll Need
Successful Harken rigging hardware replacement requires specific tools and marine-grade fasteners. Without the right equipment, installation takes longer and risks damaging expensive components.
Essential tools:
- Socket set (metric and standard sizes, typically 8mm to 14mm for most Harken hardware)
- Torque wrench (critical for fastener specifications, over-tightening strips threads)
- Swaging tool or access to a professional swaging service (if replacing wire forestay or jibstay)
- Stainless steel fasteners (316-grade minimum for saltwater environments)
- Sealant compound (marine-grade silicone or polyurethane for deck penetrations)
- Measuring tape and marking pen (for compatibility verification)
- Wire cutters and crimpers (if modifying existing rigging)
- Lubricant (marine-grade grease for winch service and moving parts)
Materials to have on hand:
- Replacement Harken cleats, fairleads, or block systems (matched to your existing hardware)
- Stainless steel backing plates (prevent fasteners from pulling through deck)
- Rubber or neoprene washers (reduce deck damage and vibration)
- Spare fasteners in common sizes (always have extras)
- Corrosion inhibitor spray (protects new hardware during installation)
The Harken Standard Carbo-Cam Cleat and similar components from Charleston Yachting come with installation guides that specify exact torque settings and fastener sizes. Having these specifications before you start prevents mistakes.
![Harken Standard Carbo-Cam Cleat [365]](https://cdn.shopify.com/s/files/1/0842/4914/9751/files/79049XL.jpg?v=1697833676)
Step-by-Step Compatibility Verification
Compatibility verification prevents costly installation errors and ensures your new hardware works with your existing rig. This is the part most guides skip, but it's where problems emerge.

Start by documenting your current setup. Photograph your deck hardware layout from multiple angles. Note the exact model numbers on existing cleats, blocks, and fairleads. Harken stamps model numbers on hardware, they're usually on the underside or back face. Write these down; you'll reference them constantly during the replacement process.
Next, verify load capacity ratings. Your existing hardware has a maximum working load (often printed on the component or in the technical manual). New hardware must meet or exceed this rating. If your boat has been upgraded with larger sails or a more powerful rigging configuration since the original hardware was installed, you may need higher-capacity components. The Harken Micro Carbo-Cam Cleat handles 150 pounds, while the Standard Carbo-Cam Cleat handles 200 pounds, a critical difference for larger boats (harken.com).
![Harken Micro Carbo-Cam Cleat [471]](https://cdn.shopify.com/s/files/1/0842/4914/9751/files/79062XL.jpg?v=1697833797)
Check fastener compatibility. Different Harken components use different fastener sizes. Measure the hole diameter on your deck or existing hardware. Metric sizes are standard on newer Harken equipment, but older hardware sometimes uses standard (SAE) fasteners. Mixing these creates loose connections and corrosion at the fastener interface.
Verify the wire diameter if you're replacing forestay or jibstay components. Fairleads and swaging fittings are sized for specific wire gauges. Using the wrong size creates excessive play or prevents the wire from seating properly. Your technical manual lists the exact wire diameter specification.
Test fit before final installation. Place new hardware against the deck or existing mount points. Ensure fastener holes align. Check that moving parts (boom vang, mainsheet system) have adequate clearance and won't interfere with adjacent components. This catches dimensional mismatches before you drill holes or apply sealant.
| Verification Step | What to Check | Why It Matters |
|---|---|---|
| Model number documentation | Existing hardware identification | Ensures compatibility with new parts |
| Load capacity rating | Maximum working load specification | Prevents failure under sail load |
| Fastener size | Metric vs. standard, diameter match | Prevents loose connections |
| Wire diameter | For standing rigging components | Ensures proper seating and load transfer |
| Test fit alignment | Physical placement and clearance | Catches errors before permanent installation |
Best Marine Hardware for Saltwater Environments
Saltwater exposure degrades hardware rapidly, making material selection critical for any Harken rigging hardware replacement. Stainless steel is the industry standard, but not all stainless steel performs equally in marine environments.
316-grade stainless steel (also called marine-grade) resists saltwater corrosion far better than 304-grade. The difference is molybdenum content, 316 has approximately 2-3% molybdenum, which prevents pitting corrosion that weakens fasteners and fittings (astm.org). This distinction matters most in areas where salt spray is constant: deck hardware, standing rigging, and boom vang systems all benefit from 316-grade materials.
Harken equipment is manufactured from marine-grade materials, but fasteners matter equally. Many boat owners make the mistake of using standard stainless fasteners with premium Harken hardware. Standard fasteners corrode faster and can create galvanic corrosion where dissimilar metals contact each other. Always pair Harken components with 316-grade stainless fasteners.
Aluminum components require special attention. Harken uses anodized aluminum in many cleats and blocks to reduce weight. Anodizing creates a protective oxide layer, but it's not indestructible. When anodizing is scratched during installation, bare aluminum underneath oxidizes rapidly in saltwater. Use corrosion inhibitor spray on these components immediately after installation.
Lubrication protects moving parts. Winch service and cam cleat mechanisms collect salt residue that accelerates wear. Apply marine-grade grease every season. This simple maintenance extends hardware life by years and prevents the sticking that makes cleats difficult to engage.
Charleston Yachting stocks Harken components specifically selected for saltwater performance. The Standard Carbo-Cam Cleat and Micro Carbo-Cam Cleat both use marine-grade materials and ball bearing mechanisms that tolerate salt exposure better than older cam designs.
Installation Procedures for Deck Hardware
Proper installation determines whether your Harken rigging hardware replacement succeeds or creates problems that compound over time. Poor installation causes fasteners to loosen under load, deck leaks, and premature corrosion.
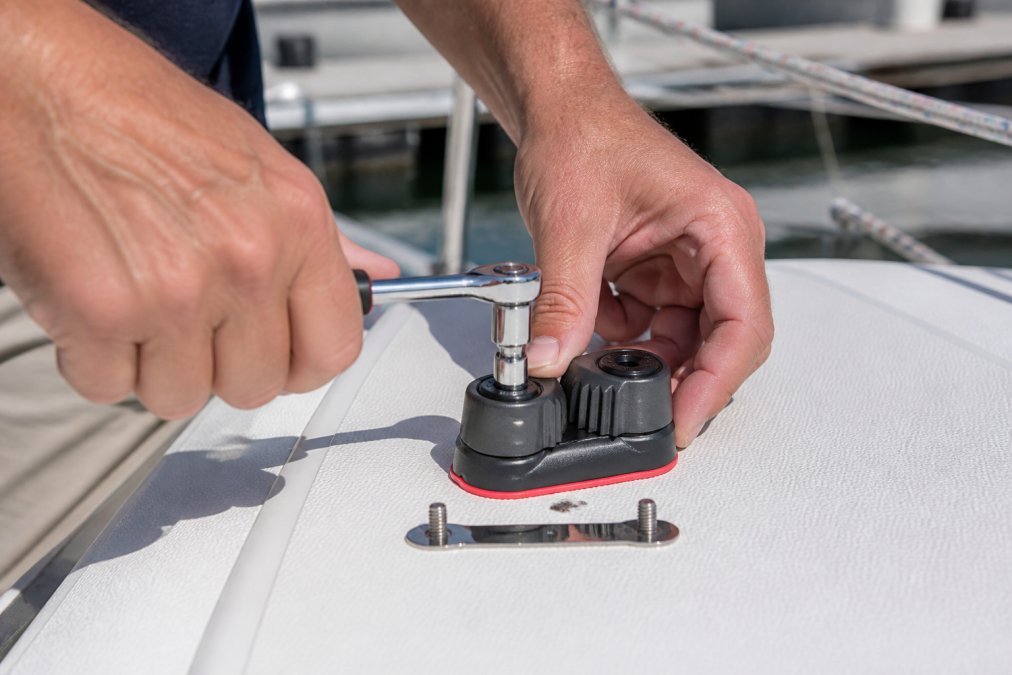
Begin by preparing the deck. Clean the area thoroughly with fresh water to remove salt residue. Dry completely. Any salt left under hardware accelerates corrosion. If you're replacing existing hardware, remove old fasteners and inspect the mounting holes. Fill any stripped or damaged holes with marine epoxy before drilling new ones.
Apply sealant before fastening. Use marine-grade silicone or polyurethane around fastener holes. This prevents water from entering the deck cavity below, which causes rot and corrosion. Don't over-apply, excess sealant squeezes out when you tighten fasteners and creates a mess. A thin, even bead is sufficient.
Install backing plates under the deck. These distribute fastener load across a larger area and prevent fasteners from pulling through the deck material. This is especially critical on fiberglass boats where fasteners can tear through the outer skin. Backing plates should be stainless steel and slightly larger than the fastener head.
Position the new hardware carefully. Use your test fit measurements to ensure exact placement. Drill fastener holes only when you're confident about position. For deck hardware like cleats or fairleads, ensure the component sits flush against the deck. Any gap indicates a problem, either the deck is warped or the hardware mounting surface is damaged.
Install fasteners with a torque wrench set to the specification in the Harken technical manual. Typical torque for small fasteners (8-10mm) ranges from 15-25 foot-pounds. Over-tightening strips threads and cracks composite materials. Under-tightening allows fasteners to loosen under the vibration and load of sailing. The torque wrench prevents both mistakes.
Tighten fasteners in a cross pattern, not sequentially around the component. This distributes pressure evenly and prevents warping. For a four-hole cleat, tighten opposite corners alternately rather than going around in order.
Allow sealant to cure fully before sailing. Most marine sealants require 24-48 hours for complete hardening. Premature loading can squeeze sealant out from under the hardware and create leaks.
Sailboat Rigging Inspection Checklist
Regular rig inspection catches problems before they become dangerous. A comprehensive sailboat rigging inspection checklist should be performed seasonally and before long passages.
Standing rigging:
- Examine wire forestay and jibstay for white oxidation or pitting (signs of corrosion)
- Check swaging where wire meets the fitting for cracks or separation
- Look for kinks or bends in wire (indicates previous failure or overload)
- Verify tension with a rig tension gauge (standing rigging should be tight, not slack)
- Test fasteners at deck penetrations for tightness (use a wrench to verify)
Deck hardware:
- Inspect boom vang fasteners and pivot points for corrosion or loose movement
- Check mainsheet system blocks and cleats for smooth operation
- Verify genoa lead car slides freely without binding
- Examine traveler kit fasteners and adjustment mechanisms
- Look for cracks in composite blocks or fairleads
Mast and boom:
- Walk around the mast looking for visible cracks or deformation
- Check mast pull (tension) by sighting up the mast track, it should be straight
- Inspect boom for dents or damage that could affect rigging geometry
- Verify reefing system hardware is secure and functional
Load capacity and failure indicators:
- Note any hardware that moves excessively or feels loose
- Document any discoloration suggesting galvanic corrosion
- Check for stress cracks around fastener holes
- Verify all fasteners are present (sometimes fasteners work loose and disappear)
Perform this inspection annually, or after any event where you experienced extreme weather or heavy load on the rig. Early detection of rigging failure indicators prevents catastrophic failures.
Troubleshooting Common Installation Errors
Installation mistakes create performance problems and safety risks. Recognizing and correcting these errors prevents expensive re-work and potential rigging failure.
Fasteners loosen after installation. This typically means insufficient torque was applied during installation, or the wrong fastener size was used. Solution: Remove the fastener, verify the correct size, and reinstall with a torque wrench set to specification. Apply a small amount of threadlocker compound (medium-strength, removable type) to prevent future loosening.
Hardware sits loose or rocks on the deck. The mounting surface is uneven, or the hardware is warped. Solution: Remove the hardware and inspect both the deck and the mounting face. Sand away any raised areas on the deck. If the hardware itself is warped, it must be replaced, don't force it down with over-torqued fasteners.
Water leaks around fasteners after installation. Sealant was not applied, or it wasn't allowed to cure fully. Solution: Remove fasteners, clean out old sealant and debris, apply fresh marine sealant, and reinstall. Allow full cure time before sailing.
Cam cleat won't hold line or releases unexpectedly. The cleat is installed at the wrong angle, or the line diameter doesn't match the cleat specification. Solution: Verify the installation angle matches the technical manual. If the angle is correct, measure the line diameter, it must fall within the cleat's rated range. The Harken Standard Carbo-Cam Cleat accepts lines from 3mm to 10mm; the Micro version handles 3mm to 6mm (harken.com). Using oversized line causes poor engagement.
![Harken Standard Carbo-Cam Kit w/Wire Fairlead [326]](https://cdn.shopify.com/s/files/1/0842/4914/9751/files/79046XL.jpg?v=1697833649)
Swaging connection shows separation or movement. The wire diameter doesn't match the fitting, or the swaging was performed incorrectly. Solution: If you performed the swaging yourself, the connection may need to be re-done by a professional swaging service. If the hardware is new, contact Charleston Yachting to verify you have the correct fitting for your wire diameter.
Fastener holes stripped or enlarged. Fasteners were over-torqued, or the wrong fastener size was used repeatedly. Solution: Fill the hole with marine epoxy and allow to cure, then drill a new hole nearby or use a larger fastener with a backing plate. Prevent future stripping by using a torque wrench.
Harken rigging hardware replacement doesn't have to be intimidating if you approach it systematically. Start with thorough documentation of your existing setup, verify compatibility before ordering, and follow torque specifications during installation. The difference between a successful replacement and a failed one often comes down to these details.
Charleston Yachting carries the full range of Harken components you'll need, including the Standard Carbo-Cam Cleat and Micro Carbo-Cam Cleat options that suit different boat sizes and load requirements. With same-day shipping and expert-curated inventory, you'll have the right hardware when you need it. Shop All to explore Harken rigging systems designed for saltwater performance.
Frequently Asked Questions
How often should I inspect my sailboat rigging hardware?
Inspect your rigging hardware at least twice per season, before spring sailing and after fall use. Check more frequently if you sail in saltwater or high-wind conditions. Look for corrosion, loose fasteners, and signs of wear on stainless steel components. A sailboat rigging inspection checklist should include visual checks for surface damage, load capacity verification, and lubrication status of moving parts like cam cleats and travelers.
Can I replace Harken traveler cars myself?
Yes, you can replace Harken traveler cars with basic tools and mechanical ability. Removal typically requires removing the mainsheet system and unbolting the old car from the track. Installation involves sliding the new car into position, aligning fastener holes, and torquing bolts to manufacturer specifications. Verify compatibility with your existing track before purchasing, Harken offers multiple car sizes for different deck layouts and load capacities.
What are the signs of fatigue in stainless steel rigging hardware?
Watch for visible corrosion pitting, white oxidation deposits, or discoloration on stainless steel components, these indicate saltwater damage and material degradation. Cracks around fastener holes, bent or deformed hardware, and excessive play in moving parts signal structural failure. Test load capacity by applying pressure to the hardware; if it flexes abnormally or makes grinding sounds, replacement is necessary. Replace any hardware showing these signs before they cause rigging failure.
How do I identify the correct Harken replacement part for my boat?
Locate the part number on your existing hardware, it's usually stamped on the cleat, fairlead, or car body. Cross-reference this number with Harken's technical manual or the product schematic for your rigging configuration. Check line diameter requirements, maximum working load capacity, and mounting hole spacing. If the original part is unmarked, measure the hardware dimensions and consult your boat's rigging diagram or contact the manufacturer for compatibility verification before ordering replacement parts.
This article was written using GrandRanker