

Signs of Corrosion on Marine Deck Hardware

Table of Contents
- Early Warning Signs of Corrosion on Marine Deck Hardware
- Why Stainless Steel Boat Hardware Rusts in Saltwater
- Galvanic Corrosion on Boats: When Dissimilar Metals Meet
- A Step-by-Step Marine Deck Hardware Inspection Checklist
- How to Clean Stainless Steel Boat Hardware and Treat Early Corrosion
- When to Replace Corroded Deck Hardware
- Conclusion
- Frequently Asked Questions
Last Updated: October 13, 2026
Early Warning Signs of Corrosion on Marine Deck Hardware
Catching the signs of corrosion on marine deck hardware early is the difference between a quick cleanup and a full replacement job. Salt, sun, and constant moisture leave a trail first.
Here's what to watch for:
- Brown or tea-colored staining around screws and fittings
- White powdery buildup on aluminum parts
- Pitting and rough, uneven surfaces
The most common mistake is treating rust stains as cosmetic. On a boat, discoloration is usually the first visible stage of corrosion, and it spreads fast.
Why Stainless Steel Boat Hardware Rusts in Saltwater
Stainless steel is not rust-proof. It resists corrosion thanks to a thin protective film called the passive layer, and saltwater attacks that film, the core reason stainless steel boat hardware rusts even when it looks fine for years.
How Chlorides Break Down the Passive Layer
Chlorides in saltwater eat away at the passive layer faster than air can rebuild it. Once the film breaks down, oxygen and moisture reach the steel underneath, and rust starts. Warm water and poor airflow make it worse.
Crevice Corrosion at Contact Areas
Crevice corrosion happens where water sits and can't drain, under washers, around fasteners, and beneath handrail bases. These spots stay wet long after the deck dries, so the passive layer never recovers.
Galvanic Corrosion on Boats: When Dissimilar Metals Meet
Galvanic corrosion on boats happens when two different metals touch in saltwater. One becomes the anode and gives up material to protect the other, causing fast, localized damage at the contact point.
Common Metal Pairings That Accelerate Damage
Watch these pairings closely:
- Stainless steel and aluminum near cleats and rails
- Stainless fasteners and bronze fittings
- Steel and stainless at mounting points
The fix is a barrier. Use insulating washers or a bedding compound to keep dissimilar metals apart. Check corrosion guidance from the American Boat and Yacht Council for best practices on metal separation.
A Step-by-Step Marine Deck Hardware Inspection Checklist
A focused deck walk-through takes most owners a reasonable amount of time. Do it at the dock on a dry day, with a bright handheld light angled low across the surface, raking light makes pitting and hairline cracks visible.
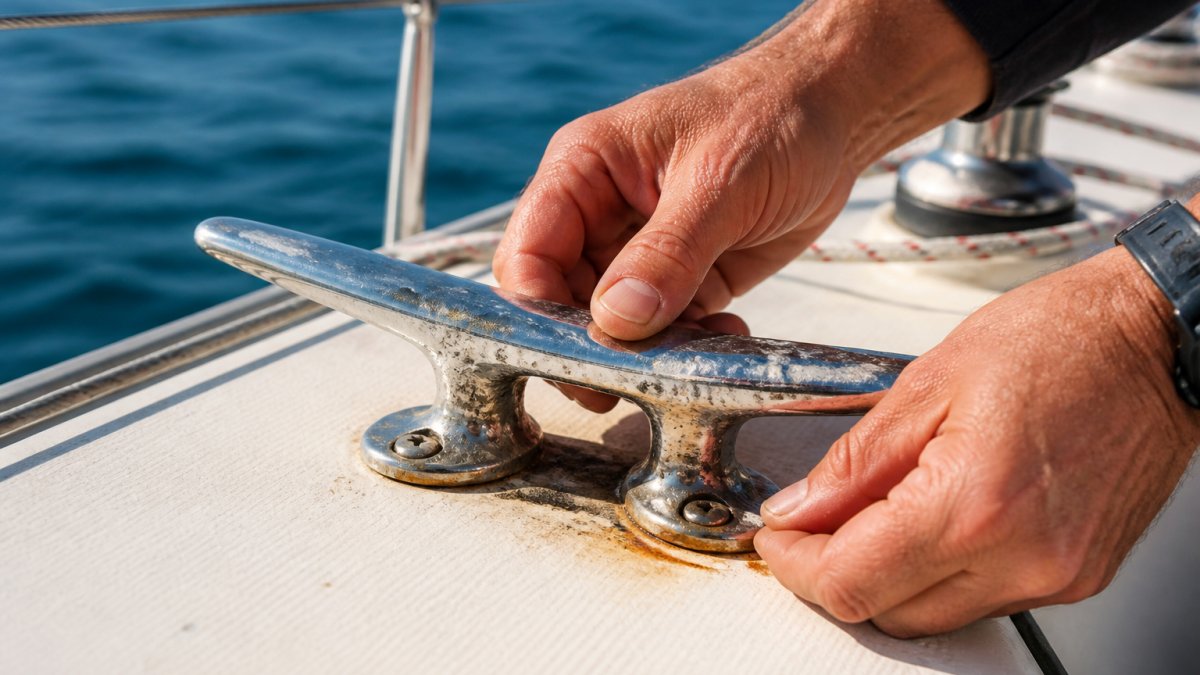
Work bow to stern and port to starboard so you cover the same path every time. Skipping around is how fittings get missed.
- Rinse and dry each zone before you judge it. Salt film hides tea-colored staining and white powder. Rinse with fresh water, wipe dry, then look.
- Inspect every fastener head. Look for brown or tea-colored staining radiating from under the head, a ring of white powder, or a head that sits proud of the surface. A stain that returns after cleaning means water is reaching the shank.
- Test for movement. Try to rock the fitting. Any movement, however slight, means the fastener or bedding has failed. Do not torque it down to hide the symptom, that crushes the sealant and hides the leak.
- Check the base and the bedding line. Sealant should be continuous and flexible. Look for cracks, gaps, shrinkage, or a dark tide line where water has been sitting. A bedding joint that has pulled away is an open door.
- Work the moving parts. Open and close hinges, turnbuckle covers, latch handles, and folding cleats. Grinding, stiffness, or a gritty feel means corrosion is inside the pivot, not just on the surface.
- Look at contact areas between dissimilar metals. Anywhere stainless meets aluminum or bronze, check for a chalky white or green residue and for metal loss on the less noble part.
- Log what you find. Note the location, the date, and a one-line description. A written or photo log is what turns a single inspection into a trend you can act on.
Under-Hardware and Below-Deck Checks
The worst corrosion almost never shows on top. It lives under the fitting, where water sits against the deck and fastener shank with no airflow.
Where the hardware allows it, back off the fasteners a turn or two and lift the fitting just enough to see the contact patch. Look for:
- Dark, wet, or stained core material around the fastener holes
- Rust streaks running down from the underside of the fitting
- Crushed or hardened bedding compound that has stopped sealing
Then go below. Water entering at a deck fitting shows up as a stain on a cabin ceiling, a soft spot in a bulkhead, or a drip onto a berth cushion. A brown ring on the headliner under a stanchion base is a deck leak, not a ceiling problem.
Surface Staining vs Structural Corrosion
The most useful skill in this process is telling the two apart. Most of what you see on deck is surface staining, and most of it will clean off.
Surface staining sits on top of the passive layer or surrounding gelcoat.
Structural corrosion has changed the metal itself. Look for:
- Pitting, small craters you can feel with a fingernail or a pick. If the pick catches, the metal has lost section.
- Material loss, a fastener head that is visibly smaller or rounded off, or a fitting edge that has thinned.
- Cracking, hairline cracks at a bend, a weld, or a fastener hole. Cracks in loaded hardware do not heal.
A simple rule: if it cleans off and stays clean, monitor it. If it returns, or the metal is pitted, cracked, soft, or moving, it is structural and needs replacement, not polishing.
Photograph each spot before and after cleaning, and note the date. A photo log shows whether a stain returns, which tells you if it is surface-only or a deeper problem. It also gives a yard or rigger a clear history if you hand the job off.
Severity Thresholds: Monitor, Clean, Re-Bed, or Replace
Use these thresholds to decide what to do with each finding:
| Finding | Severity | Action |
|---|---|---|
| Light staining that cleans off and stays clean | Low | Monitor at the next inspection |
| Staining that returns, or white powder on aluminum | Moderate | Clean, dry, and re-seal the surface |
| Cracked or shrunken bedding, no metal damage | Moderate | Re-bed the fitting with fresh sealant |
| Pitting, material loss, or a fastener that will not hold torque | High | Replace the hardware |
| Cracks, soft metal, or movement in a load-bearing fitting | Critical | Take the load off it and get a professional assessment before you sail |
Safety-critical hardware, chainplates, stanchion bases, cleats, and anything carrying rig or crew load, should be assessed by a qualified marine surveyor or rigger once you find pitting, cracking, or movement.
How to Clean Stainless Steel Boat Hardware and Treat Early Corrosion
Cleaning stainless steel boat hardware starts with a fresh water rinse, then soap and water with a soft cloth. Skip abrasive pads, they scratch the surface and strip the passive layer, inviting more corrosion. Rinse again and dry the metal. For light staining, a non-abrasive marine cleaner helps, and re-bed any fitting where the sealant has cracked.
When to Replace Corroded Deck Hardware
Replacement is not about how bad the stain looks. It is about whether the metal has enough section left to carry its load, and whether the fastener and bedding still keep water out. A part can fail either one.
The Mechanisms That Force Replacement
Section loss from pitting. Corrosion eats metal from the surface inward.
Fatigue at fastener holes. Every load cycle, every tack, wake, or crew member stepping on a stanchion, flexes the hardware at its fastener holes.
Galvanic metal loss. Where stainless touches aluminum or bronze in saltwater, the less noble metal gives up material.
Crevice attack under bedding. Water trapped under a fitting keeps the passive layer from rebuilding.
Cosmetic vs Load-Bearing: Different Rules
Not all deck hardware carries the same consequence of failure.
- Load-bearing hardware, chainplates, stanchion and pulpit bases, cleats, winch bases, handrail bases, and anything that holds rig tension or crew weight. Any pitting, cracking, softness, or movement here is a replacement, not a repair. There is no acceptable field fix for a cracked chainplate.
- Non-structural hardware, decorative trim, latch covers, cup holders, and similar fittings. Surface corrosion here is a cosmetic decision. Replace when it bothers you or when it stops functioning, but it is not a safety item.
When in doubt, ask what happens if the part fails at the worst possible moment. If the answer involves the rig coming down or a crew member going over the side, treat it as load-bearing.
Repair vs Replace: The Practical Trade-Off
Some findings are genuinely repairable, and some are not.
Worth repairing:
- Surface staining that cleans off and stays clean
- Cracked or shrunken bedding with no metal damage, re-bed with fresh marine sealant
- A single fastener that has corroded while the fitting itself is sound, replace the fastener and re-bed
Not worth repairing:
- Pitting deep enough to catch a pick
- Cracks anywhere in the part, including at welds
- A fastener hole that has enlarged or will not hold torque
Replacing a fitting early can prevent more extensive damage. An unaddressed leaking stanchion base can lead to further issues, potentially requiring significant repair work.
A Simple Decision Sequence
- Clean the part and re-inspect. If the stain is gone and stays gone, monitor it.
- If the stain returns, check the bedding. Re-bed if the metal is sound.
- If the metal is pitted, cracked, or soft, replace the part.
- If the part is load-bearing and shows any of those signs, take the load off it and have it assessed by a qualified surveyor or rigger before you sail again.
- Log the replacement date and the reason. It builds a maintenance history and tells you whether a location has a recurring problem.
| Sign | What It Means | Action |
|---|---|---|
| Brown staining | Early corrosion | Clean and monitor |
| White powder | Aluminum breakdown | Clean and seal |
| Pitting | Structural damage | Replace the part |
| Loose fastener | Water intrusion | Re-bed or replace |
| Cracked sealant | Water getting in | Re-seal now |
| Cracks or soft metal | Fatigue or section loss | Replace; assess if load-bearing |
Conclusion
Corrosion rarely announces itself. It starts as a stain, then a rough spot, then a fitting you can't trust. Owners who stay ahead of it inspect often and replace early. Charleston Yachting carries the premium deck hardware and rigging you need to keep your vessel sound, with fast fulfillment so you're never waiting on the water. Shop All and get the right parts shipped the same day.
Frequently Asked Questions
What does corrosion on marine deck hardware look like?
Early corrosion on deck hardware shows as brown or tea-colored staining around fasteners, fittings, and handrail bases. On aluminum parts, you may see a white powdery buildup. Pitting appears as small dark craters in the metal surface, while advanced corrosion causes rough spots, hairline cracks, and stiff hinge pins. Check contact areas where hardware meets the deck, since moisture and salt collect there and damage often starts out of sight.
Can corroded boat hardware be cleaned, or should it be replaced?
Surface staining and light discoloration usually clean up with fresh water, soap, and a soft brush. Pitting, cracked sealant around fasteners, or loose mounting points signal structural damage that cleaning cannot fix. If pitting has penetrated the surface or a fitting flexes under load, replace it. When in doubt, remove the hardware and inspect the underside of the mounting point before deciding.
What causes rust stains around stainless steel deck fittings?
Stainless steel relies on a passive layer of chromium oxide to resist corrosion. Salt spray, immersion, and trapped moisture break that layer down, letting rust form. Stains often come from external sources too, such as carbon steel particles from tools or nearby corroding parts depositing on the surface. Crevice corrosion under sealant or between contact areas is another common cause of staining around fittings.
How often should you inspect marine deck hardware for corrosion?
Inspect deck hardware at least monthly during active boating season and before any offshore passage. After heavy saltwater exposure, rinse with fresh water and check fasteners, fittings, and handrail bases for discoloration or loose movement. Annual haul-out is the time for a full inspection, including under-hardware and below-deck checks where hidden corrosion and water intrusion are most likely to develop.
This guide from Charleston Yachting covers how to spot and stop corrosion before it costs you a season on the water.