

Signs of Sailboat Rigging Failure: A 2026 Inspection Guide

Table of Contents
- Why Standing Rigging Fails: The Most Common Causes
- Visual Signs of Sailboat Rigging Failure You Can Spot Today
- Mast Pumping, Swaying, and Alignment Warning Signs
- Standing Rigging Inspection Tools and DIY vs. Professional Surveys
- Sailboat Rigging Maintenance Checklist for Preventative Care
- Sailboat Rigging Replacement Schedule by Material Type
- Insurance Implications and the Cost of Ignoring Rigging Failure
- Conclusion
- Frequently Asked Questions
Last Updated: September 15, 2026
Why Standing Rigging Fails: The Most Common Causes
Standing rigging failure rarely happens without warning. The wire, terminals, or chainplates usually signal distress for months or years before something lets go, but few sailors know what to look for, or they assume a rig that "looks fine" is fine.
The causes are predictable, metal fatigue from cyclic loading, crevice corrosion inside swage fittings where moisture intrudes and oxygen can't reach, and stress cracks at chainplates that began as hairline fractures years ago. In saltwater, stainless steel is not immune to corrosion, just more resistant than mild steel.
![C. Sherman Johnson Open Body Jaw to Swage Turnbuckle f/3/16" Wire [27-316]](https://cdn.shopify.com/s/files/1/0842/4914/9751/files/80961XL.jpg?v=1697834338)
The good news is that every one of these failure modes leaves physical evidence. You just need to know where to look and what a healthy rig actually looks like.
Visual Signs of Sailboat Rigging Failure You Can Spot Today
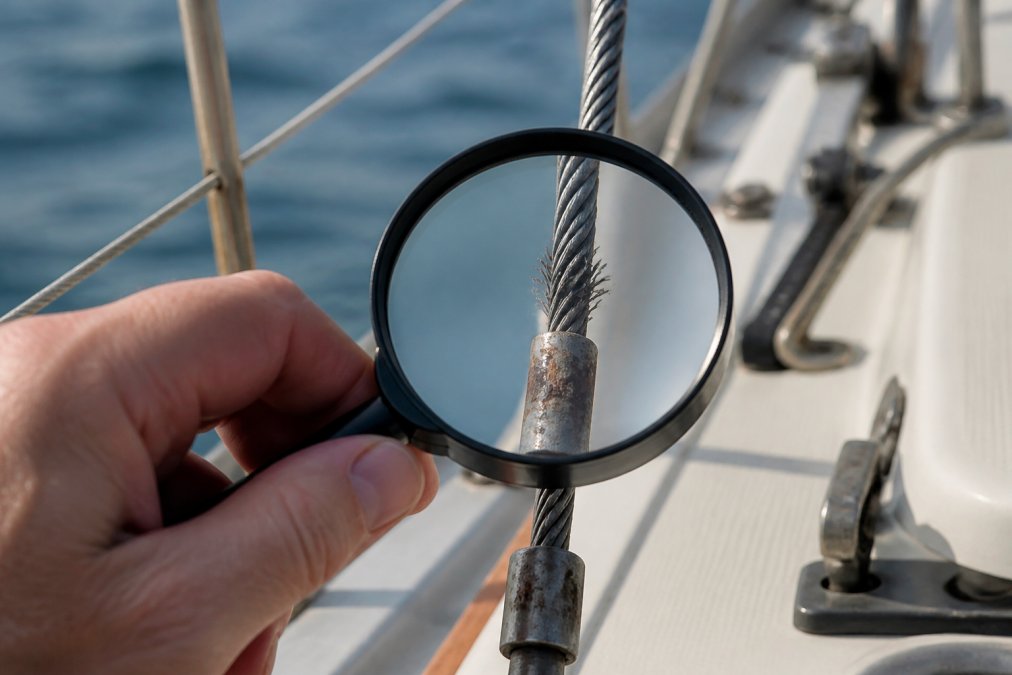
The most reliable early warning signs of sailboat rigging failure are visible during a slow, methodical walk-around. You don't need laboratory equipment to spot fraying wire, discolored terminals, or cracked chainplates, just good light, a magnifying glass, and the discipline to check every terminal, swage fitting, and inch of wire from deck to masthead.
Wire Fatigue, Fraying, and Strand Breakage
Wire fatigue shows up as broken strands, often called "meat hooks," protruding from the wire rope. Run a gloved hand or cloth along each shroud and stay, any snag means a broken strand, and a single one in a critical shroud is serious, not cosmetic. Kinking is another red flag: a kinked wire has been overloaded or mishandled, compromising its integrity even if no strands have parted.
Corrosion, Discoloration, and Crevice Corrosion at Terminals
Crevice corrosion is the silent killer of stainless steel rigging, occurring in the tight gaps inside swage fittings and mechanical terminals where seawater sits stagnant and oxygen cannot reach. Look for rust bleeding, brown discoloration, or hairline cracks where the wire enters the terminal, any discoloration at a swage fitting or turnbuckle thread warrants professional inspection. Pay particular attention to cotter pins and toggles, cheap parts that fail with expensive consequences.
![C. Sherman Johnson Tubular Turnbuckle w/Splice Eye [LS-2900]](https://cdn.shopify.com/s/files/1/0842/4914/9751/files/80938XL.jpg?v=1697834143)
Mast Pumping, Swaying, and Alignment Warning Signs
Mast pumping, a rhythmic fore-and-aft oscillation in a seaway or swell, signals rigging tension that is too low or unevenly set. Side-to-side swaying points to loose shrouds or a mast out of column. Both mean the rigging has lost its designed preload, and both accelerate metal fatigue throughout the rig.
Check mast alignment by sighting up the spar from deck level, it should be straight and centered, with no visible bend or lean. Turnbuckle thread engagement should be equal on both sides, with none backed out near its limit. A rig tuned correctly two seasons ago may have slackened as fittings settled and wire stretched; retuning is not a one-time job.
Standing Rigging Inspection Tools and DIY vs. Professional Surveys
A basic DIY inspection needs only a magnifying glass, bright flashlight, rag for the wire-wipe test, and rigging tension gauge. These catch fraying, discoloration, and grossly uneven tension, but not internal corrosion inside a swage fitting, hidden cracks in a chainplate below deck, or fatigue that hasn't surfaced as a broken strand. Knowing where that line falls separates a useful owner inspection from false security.
What a DIY Inspection Can and Cannot Detect
An owner working from deck level can reliably find:
- Broken strands and meat hooks, the wire-wipe test with a cloth or gloved hand catches protruding strands along the full length of each shroud and stay.
- External corrosion and rust bleeding, brown staining at a swage fitting, turnbuckle, or clevis pin is visible without magnification.
- Turnbuckle thread engagement, count exposed threads on both sides; unequal engagement means the rig is out of tune.
- Cotter pin and ring condition, missing, bent, or reused cotter pins are a common and preventable failure point.
- Mast alignment from deck level, sighting up the spar reveals bend, lean, or a mast out of column.
- Tension comparison port to starboard, a gauge reading on each shroud exposes gross imbalance even if absolute values are uncertain.
An owner working from deck level generally cannot reliably find:
- Crevice corrosion inside a swage or mechanical terminal, the corrosion is by definition in a gap the eye cannot reach.
- Chainplate cracks below deck, the highest-load, least-visible part of many rigs.
- Masthead and spreader-attachment fatigue, requires going aloft with good light and a magnifier.
- Internal wire fatigue that has not yet broken a strand, no external sign until it fails.
What Professional Inspection Methods Actually Detect
A professional rigging survey is not just "a more thorough look." It uses specific methods, each targeting a failure mode the eye misses:
| Method | What It Detects | Typical Use |
|---|---|---|
| Dye penetrant testing | Surface-breaking cracks in fittings, chainplates, and rod terminals | Suspect terminals, chainplate welds |
| Radiographic (X-ray) inspection | Internal corrosion and cracks inside swage fittings | High-value or offshore rigs |
| Dye penetrant + visual on rod heads | Cold-flow cracks at rod terminal heads | Rod rigging over 10 years old |
| Going aloft with magnification | Masthead fittings, spreader roots, upper terminals | Every full survey |
| Tension gauge + tuning check | Uneven preload that accelerates fatigue | Every full survey |
| Below-deck chainplate inspection | Hidden cracks, crevice corrosion, deck-core moisture | Boats over 10 years old |
According to guidance from the American Boat & Yacht Council, rigging inspection standards exist precisely because visual inspection alone misses internal failure modes. A surveyor who only looks and does not test is not performing a survey, they are performing an opinion.
The DIY vs. Professional Decision Rule
A practical rule most riggers use:
- Every season, owner inspection, wire-wipe test, terminal visual, tension gauge, cotter pins, mast sighting.
- Every 2-3 years, professional aloft inspection, even on a well-maintained boat, because masthead and spreader fittings are where owners cannot see.
- Every 10 years, or after any offshore passage, full survey with dye penetrant or radiographic testing, because internal corrosion and fatigue are time- and load-dependent, not appearance-dependent.
- Immediately, after any of these findings, broken strand, rust weeping from a terminal, crack at a chainplate, or a rig that suddenly went slack.
Sailboat Rigging Maintenance Checklist for Preventative Care
A sailboat rigging maintenance checklist turns inspection into a routine. Run through it at the start of every season and after any significant offshore passage.
Photograph every terminal and chainplate at the start of each season. Side-by-side photos from year to year reveal slow deterioration that a single inspection will miss entirely.
Sailboat Rigging Replacement Schedule by Material Type
| Material | Typical Service Life | Primary Failure Mode | What to Inspect |
|---|---|---|---|
| Galvanized steel wire | 5-10 years | General corrosion, strand pitting | Rust staining, wire diameter loss |
| 304 stainless steel | 10-15 years | Crevice corrosion at swage fittings | Rust bleeding, hairline cracks at terminals |
| 316 stainless steel | 10-15 years | Crevice corrosion (slower than 304) | Same as 304, plus terminal thread condition |
| Rod rigging | 15-20+ years | Cold-flow cracks at terminal heads | Dye penetrant at rod heads, head deformation |
| Dyneema / synthetic | 5-8 years | UV degradation, creep under sustained load | Chalky surface, color fade, elongation |
Why Tuning and Tensioning Drive Replacement Timing
Replacement Triggers Beyond Age
A rig that "looks fine" at 12 years old on a saltwater boat is not evidence of health, it is evidence that the failure has not happened yet. Crevice corrosion and fatigue are internal processes. Replace on schedule, or survey to extend the schedule with evidence.
Insurance Implications and the Cost of Ignoring Rigging Failure
Conclusion
National Weather Service marine safety resources
Frequently Asked Questions
How often should you replace sailboat rigging?
Most sailboat rigging replacement schedules recommend replacing standing rigging every 10 to 15 years for stainless steel wire, regardless of visible condition. Boats kept in warm, saltwater environments may need replacement closer to 10 years due to accelerated crevice corrosion. Factors like sailing load, original wire diameter, and whether the rigging has been through a hurricane or grounding can shorten that window. Professional rig surveys can help you decide if an early replacement is needed.
What are the most common signs of wire rope fatigue?
Wire fatigue shows up as broken individual strands, especially near swage fittings or mechanical terminals, and as kinking or a 'meat hook' shape where the wire has been bent past its yield point. Fraying, flattened sections, and a fuzzy appearance along the wire are also common. Any strand breakage means the wire has lost strength and should be replaced, because the remaining strands carry more load and can fail suddenly under sail.
Can you visually inspect swage fittings for internal corrosion?
You cannot see internal crevice corrosion inside a swage fitting from the outside. What you can look for are warning signs: rust stains or discoloration at the fitting ends, cracks in the swage, or a slight bulge. Moisture intrusion and saltwater corrosion happen inside the fitting where the wire enters. Because internal cracks and corrosion are hidden, a professional rig survey with dye penetrant or a hammer tap test is the only reliable way to catch early terminal failure.
What are the dangers of crevice corrosion in stainless steel rigging?
Crevice corrosion in stainless steel rigging attacks hidden areas where oxygen is limited, such as inside swage fittings or under cotter pins. It can reduce the wire's strength by 50 percent or more without visible surface rust. The danger is sudden terminal failure under load, which can bring down the mast. Regular freshwater rinsing, inspecting turnbuckles and toggles for discoloration, and replacing rigging on a schedule are the best defenses.