

Signs of Wear on Marine Rigging Hardware to Check

Quick Summary
Signs of wear on marine rigging hardware include hairline cracks at swages, toggles and eye terminals, rust bleeding from crevices or threads, and worn turnbuckle threads. Broken wire strands, birdcaging and running line that has lost more than 10% of its diameter also call for replacement or closer inspection.
- A single broken wire in a standing rig is a yellow flag that calls for a closer look.
- Replace running rigging when its diameter has reduced by more than 10%.
- Do not cover cracks with paint or tape, since paint can hide the crack you need to see.
- Measure pin holes and wire diameters with a caliper or go/no-go gauge rather than relying on eyeballing.
- Scrub suspect areas and recheck: solid metal suggests cosmetic corrosion, while deep pitting or returning rust is structural.
Table of Contents
- Why Rigging Hardware Wear Matters Before a Failure
- Visible Cracks, Rust, and Turnbuckle Marks to Look For
- Marine Rigging Inspection Checklist, Component by Component
- Cosmetic Corrosion Versus Structural Damage
- Turnbuckle Inspection and Maintenance Steps
- Chainplate Corrosion Inspection and What to Do Next
- Booking Your Rigging Check and Choosing Replacement Parts
- Frequently Asked Questions
Why Rigging Hardware Wear Matters Before a Failure
Marine rigging hardware rarely fails without warning. Visible cracks, rust and worn turnbuckle threads usually show up first, and spotting them early is the cheapest way to avoid a dismasting or a failed shroud at sea. This guide walks through the signs to check and what to do about them.
Maintenance experts describe several warning signs that appear before standing or running rigging gives way. A common one is a wire strand that breaks in a standing rig. Treat a single broken wire as a yellow flag that calls for a closer look at the shrouds, stays and turnbuckles. For guidance on picking good replacement blocks for your rig, see Sailboat Blocks: How to Choose the Best for Rigging.
Running rigging gives its own warning. A reduction in diameter of more than 10% is a widely used threshold for replacing a line, according to NauticEd sailing maintenance video.
Wear builds slowly, so a quick look every season catches most problems. Check your marine rigging hardware after heavy weather, after a long layup and before any race or offshore passage.
Visible Cracks, Rust, and Turnbuckle Marks to Look For
Start with the obvious signs. Cracks, heavy rust and marks on the turnbuckle body are the most common reasons to pull a fitting for inspection. Charleston Yachting maintenance tips list these visual indicators as the usual precursors to rigging failure.
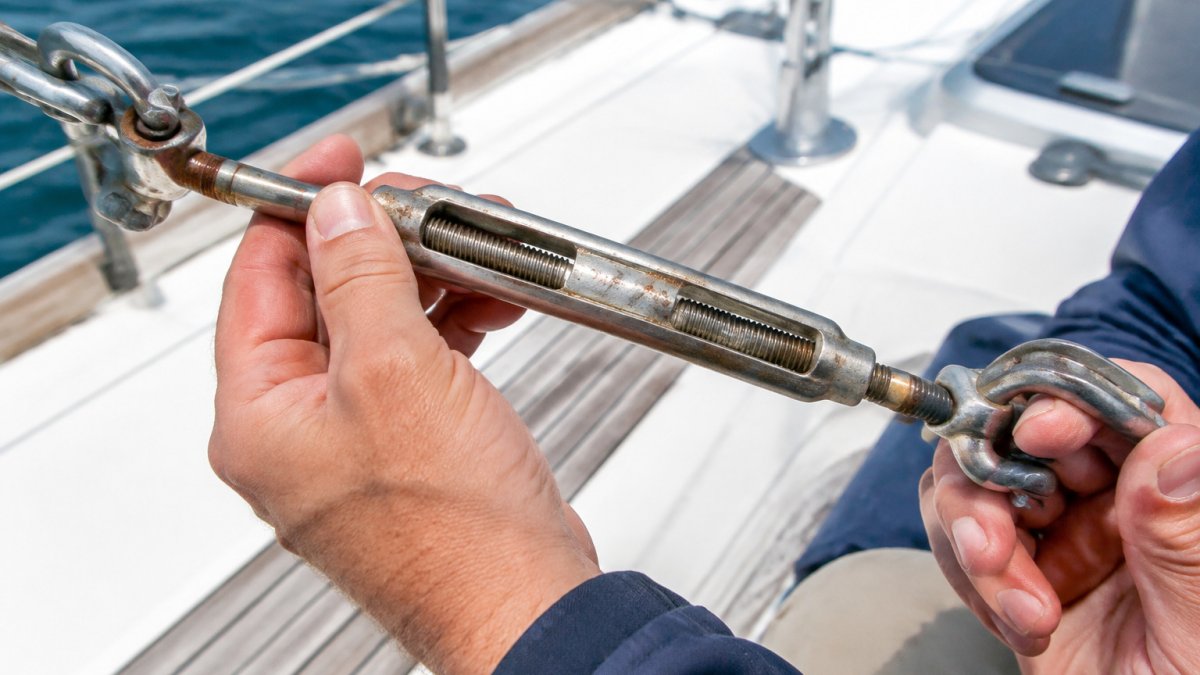
Walk the rig slowly with a flashlight and look for:
- Hairline cracks at swage fittings, eye terminals and toggle bodies
- Rust bleeding from crevices, threads or fastener holes
- Bright, polished marks where a turnbuckle body rubs against another fitting
- Bent or flattened sections in the jaw or eye
Light surface rust on stainless steel is common and often harmless. Deep rust, flaking or rust that keeps returning after cleaning needs a closer look.
Watch out: Do not hide a crack with paint or tape. A coat of paint can cover the very crack you need to see.
Marine Rigging Inspection Checklist, Component by Component
A structured checklist keeps the inspection consistent from year to year and from one fitting to the next. Work through each component in the same order every time, clean it first, and inspect under good light. Note anything unusual in a log so you can compare it against the next inspection.
- Turnbuckles: Check the threads for wear, galling and flattened crests, look for cracks in the body and around the locking pins, and confirm the pins seat fully. A thread that rocks in its nut or shows a bright polished band is worn and should be pulled for closer inspection.
- Toggles: Look for elongated pin holes, oval wear at the jaw, and cracks radiating from the pin hole. Check that the toggle articulates freely without side-to-side play.
- Clevis pins and cotter pins: Confirm the clevis pin is the correct diameter for the hole, fully seated, and that the cotter pin or ring is present, straight and spread. A missing or bent cotter pin is a defect, not a nuisance.
- Shackles and terminals: Look for deformation, stretching, worn bow or pin surfaces, and cracks at the bow-to-pin transition. Check that the pin threads engage fully and that the shackle closes without a gap.
- Chainplates: Check for crevice corrosion where the chainplate passes through the deck, staining at the deck seal, soft deck core around the fitting, and thinning or pitting on the hidden section below deck.
- Wire rope: Look for broken wires (especially at the swage and at the first few inches beyond it), birdcaging, kinks, and flattened or crushed sections. Count broken wires in a lay and compare against the wire manufacturer's discard criteria.
- Swages and terminals: Inspect for cracks at the mouth of the swage, rust bleeding from the fitting, a visible gap between wire and fitting, and any sign the wire has pulled into the swage.
- Running rigging: Measure the diameter at several points and compare against the original spec, and check for flat spots, fraying, glazing, and stiffness that does not relax when unloaded.
The C. Sherman Johnson Double Jaw Rigging Toggle is available in a 1/4" pin version and a 5/16" pin version. When you replace a toggle, match the pin size to the original fitting and check the manufacturer's dimension chart before you order.

Watch out: A checklist only works if you actually measure. Eyeballing a pin hole or a wire diameter misses slow wear that a caliper or go/no-go gauge will catch, so keep both in your rigging bag and record the readings.
The checklist covers what to inspect on each rigging component and which signs point to a problem.
| Component | Sign to check | Action |
|---|---|---|
| Turnbuckles | Worn threads, cracks, pins not seated | Pull for closer inspection |
| Toggles | Elongated pin holes, cracks, play | Replace if worn |
| Clevis and cotter pins | Missing or bent cotter pin | Treat as a defect |
| Shackles | Deformation, stretching, cracks | Check pin threads engage fully |
| Chainplates | Crevice corrosion, deck staining, thinning | Inspect below deck |
| Wire rope | Broken wires, birdcaging, kinks | Compare broken-wire count with discard criteria |
| Swages | Cracks, rust bleeding, wire pulled in | Investigate and replace if damaged |
| Running rigging | Diameter reduced more than 10% | Replace the line |
Cosmetic Corrosion Versus Structural Damage
Not all rust is a problem, but the type of metal decides what you are looking at. Stainless steel, galvanized steel, aluminum and mixed-metal assemblies each fail in different ways, and the same brown stain means different things on each.
Stainless steel. Light surface staining that wipes off and leaves clean, solid metal underneath is usually cosmetic. Stainless protects itself with a passive oxide layer, and that layer can be disrupted by salt, lack of oxygen, or contact with carbon steel. The real risks are crevice corrosion (hidden under a fitting, in a swage, or under a chainplate where oxygen cannot reach the surface) and pitting.
Galvanized steel. The zinc coating sacrifices itself to protect the steel, so a dull gray or white powdery surface is normal. Red rust means the zinc is gone at that spot and the steel is corroding. Flaking zinc, rust bleeding from threads, and rust at the transition between coated and uncoated sections are reasons to remove the part from service.
Aluminum. Aluminum does not rust red; it forms a white or gray oxide and pits. White powder around a stainless fastener threaded into aluminum is a sign of galvanic corrosion, and the aluminum around the fastener may be deeply pitted even though the surface looks intact. Check fastener holes and fittings mounted on aluminum spars and hulls closely.
Mixed-metal assemblies. Anywhere stainless meets aluminum, or galvanized meets stainless, galvanic corrosion accelerates. Look for white or green corrosion product at the joint, paint blistering around a fitting, and metal loss on the less noble part. Isolating washers and bedding compound slow the process but do not stop it once it starts.
A simple field test helps. Scrub the area with a stiff brush and fresh water, dry it, and look again under good light. If the surface stays clean and the metal feels solid, the corrosion is likely cosmetic. If the metal looks thin, pits deeply, crumbles, or the rust returns from a crevice within a short time, treat the part as structural damage and replace it.
Watch for these red flags:
- Pitting deep enough to catch a fingernail
- Rust or white powder bleeding from inside a swage, terminal, or fastener hole
- Visible thinning or stretching at a load point
- Corrosion product at a stainless-to-aluminum joint
Watch out: Corrosion inside a fitting is hard to judge by eye, and cleaning can remove the evidence. If you suspect hidden damage, have a qualified rigger inspect the part before the rig goes back into service.
Turnbuckle Inspection and Maintenance Steps
Turnbuckles carry a lot of load and are easy to overlook. Follow these steps each season.
- Back off the turnbuckle until the rigging is slack enough to inspect the threads
- Clean the threads with a wire brush and fresh water, then dry them
- Check the threads for wear, galling or flattened crests
- Inspect the body for cracks, bends and rust around the locking pins
- Lubricate the threads with a light marine grease before reassembly
- Retighten and set the locking pins to the correct position
The C. Sherman Johnson Tubular Turnbuckle with Splice Eye is a practical choice when you need a replacement with a splice eye at one end. For rigs that need a different body style, the C. Sherman Johnson Open Body Turnbuckle with Splice Eye is an alternative.


Chainplate Corrosion Inspection and What to Do Next
Chainplates are hard to inspect because much of the fitting sits under the deck or inside the hull. Look closely at the point where the chainplate meets the deck, where crevice corrosion tends to hide.
Pull the deck fitting if you see staining, soft spots in the surrounding deck or any movement at the base. Clean the chainplate and check the metal for thinning. If you find pitting or cracks, replace the chainplate before the rig goes back into service.
After any repair, check that the replacement is sized to the rig and that the fastenings are secure. Test the rig gradually and recheck the fittings after the first sail.
Booking Your Rigging Check and Choosing Replacement Parts
If you find defects you are not sure about, have a professional inspect the rig before sailing. A rigging professional can measure wire diameter, check swage fittings and confirm whether a fitting is still safe to load.
When you choose replacement parts, match the size, material and rated load to the original. Check that new toggles and turnbuckles fit the existing terminals. Charleston Yachting carries rigging hardware, and you can check sizing details on each product page before you order.
Once you know what needs replacing, start with the most worn parts. A new turnbuckle or toggle may cost far less than the damage a failed fitting can cause.
Ready to replace worn hardware? Browse Charleston Yachting's rigging selection, including the C. Sherman Johnson turnbuckles and double jaw toggles, and get same-day shipping on in-stock parts. Shop All.
Frequently Asked Questions
How often should sailboat rigging hardware be inspected?
Inspect standing and running rigging at least once a season and after any hard sailing, storm, or grounding. Check shackles, turnbuckles, toggles, and chainplates by hand and by eye, looking for cracks, elongation, and corrosion. Keep a logbook of each inspection so you can see how quickly wear is progressing and plan replacements before a failure happens on the water.
When should standing rigging hardware be replaced?
Replace standing rigging hardware when you find cracks, deep pitting, visible elongation in pin holes, or a single broken wire strand in a shroud or stay. Many sailors also treat a reduction in diameter greater than 10% in running rigging as a replacement threshold. If you are unsure whether a fitting is safe, a rigging professional can measure it and give you a clear recommendation.
Can a small crack or deformation make rigging hardware unsafe?
Yes. Cracks and deformation can grow under load and cause sudden failure, even when the damage looks minor. Any crack in a fitting, bent clevis pin, or stretched hole should be treated as a reason to remove the part from service. Replace the component rather than trying to repair it, and check the mating parts for similar wear.
What is the difference between a turnbuckle that is worn and one that is simply dirty?
A dirty turnbuckle can be cleaned and lubricated, while a worn one shows physical change: threads that feel rough or slip, body or eyes that have stretched, or cracks near the threads. Back off the turnbuckle and inspect the threads and the jaw or eye ends. C. Sherman Johnson Open Body and Tubular Turnbuckles with Splice Eyes are options when you need to replace a worn unit.
